Table of Contents
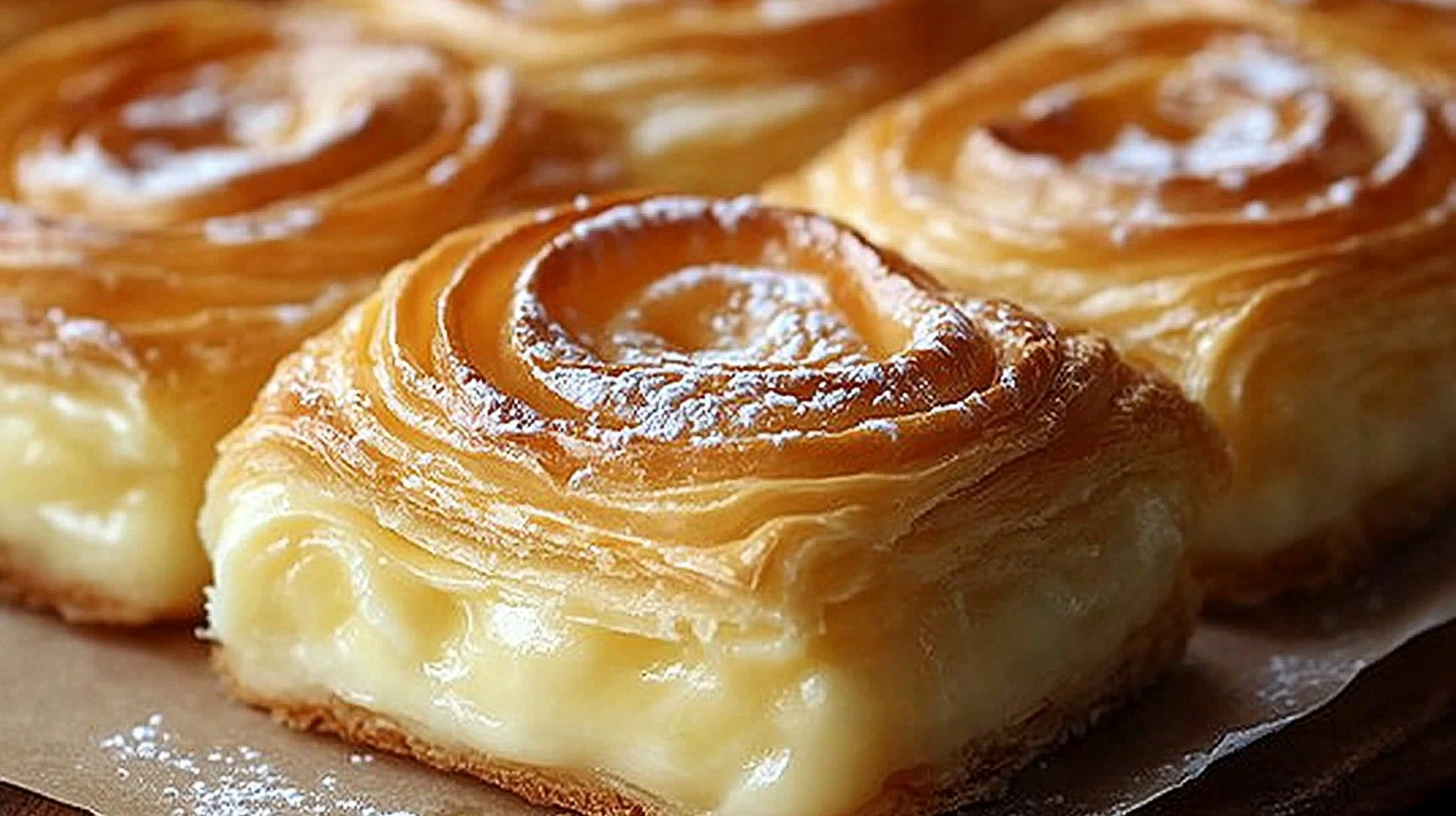
Ah, creamy custard Danish pastries—just the name alone makes your mouth water, doesn’t it? These golden, flaky delights with their luscious custard centers have a way of bringing joy to any breakfast table, coffee break, or dessert spread. There’s something magical about biting into that crisp, buttery exterior and meeting the silky, vanilla-infused custard inside.
But what makes these pastries so special? And how did they become a staple in bakeries around the world? Let’s take a flavorful journey into the world of creamy custard Danish pastries and uncover their secrets.
The Essential Ingredients for Perfect Custard Danish Pastries
Before we dive into the baking process, let’s talk about ingredients. A great Danish pastry relies on the right combination of elements. Here’s what you’ll need:
Key Ingredients for the Flaky Pastry Dough
The dough is the backbone of the pastry. Here’s what you need to create that iconic flaky texture:
- All-Purpose Flour: Provides the pastry’s structure.
- Unsalted Butter (Cold): The secret to flaky layers. Make sure it’s chilled to create pockets of steam while baking.
- Granulated Sugar: Adds a touch of sweetness.
- Active Dry Yeast: Helps the dough rise and develop its airy texture.
- Whole Milk: Adds moisture and richness.
- Eggs: Contribute to the dough’s elasticity and flavor.
- Salt: Balances the sweetness and enhances overall flavor.
Pro Tip: Always use high-quality butter for the best flavor and texture. Danish butter, known for its higher fat content, is an excellent choice.
Crafting the Perfect Creamy Custard Filling
Now for the star of the show: the custard. A smooth, luscious custard is what makes these pastries irresistible. Here’s the ingredient list:
- Whole Milk: The base for a rich, creamy texture.
- Egg Yolks: Provide the custard’s silky consistency.
- Granulated Sugar: Sweetens the filling without overpowering it.
- Cornstarch: Thickens the mixture to the perfect custard consistency.
- Pure Vanilla Extract: Delivers that classic, comforting flavor.
- A Pinch of Salt: Enhances the sweetness and adds depth.
Why Quality Ingredients Matter
When it comes to baking Danish pastries, cutting corners on ingredients can lead to disappointing results. Using fresh, high-quality eggs, real vanilla extract instead of imitation, and premium butter makes all the difference.
Imagine biting into a pastry where the custard is creamy and fragrant, and the dough flakes apart with each bite. That experience starts with what you put in the bowl.
Step-by-Step Guide: How to Make Creamy Custard Danish Pastries at Home
Baking creamy custard Danish pastries might seem like a task best left to professional bakers, but trust me, with a little patience and some tried-and-true techniques, you can master these delectable treats right in your own kitchen. From preparing the dough to making that silky custard and finally assembling and baking, I’ll walk you through every step.
So, let’s get baking!
Preparing the Dough – Tips for a Flaky, Buttery Base
Danish pastry dough is essentially laminated dough—similar to croissant dough but slightly sweeter. The lamination process involves folding butter into the dough multiple times to create those irresistible, flaky layers.
Ingredients You’ll Need (Recap)
- 4 cups all-purpose flour
- 1 cup unsalted butter (cold, cut into cubes)
- 1 cup whole milk (warm, around 110°F)
- 1/4 cup granulated sugar
- 2 large eggs
- 2 1/4 tsp active dry yeast (one packet)
- 1 tsp salt
Step-by-Step Instructions
- Activate the Yeast:
- In a small bowl, mix the warm milk with sugar and yeast. Let it sit for about 10 minutes until frothy. If it doesn’t foam, your yeast might be inactive—start over with fresh yeast.
- Mix the Dough:
- In a large bowl, combine flour and salt. Add the yeast mixture and eggs, then mix until it forms a sticky dough.
- Incorporate the Butter:
- On a floured surface, roll out the dough into a rectangle. Place the cold butter cubes evenly over the dough, then fold it into thirds like a letter.
- Lamination Process:
- Roll the dough out again, fold it, and repeat this process 3–4 times. This creates the flaky layers Danish pastries are known for.
- Chill the Dough:
- Wrap the dough in plastic wrap and chill for at least 2 hours, or preferably overnight. Cold dough makes lamination easier and more effective.
Making the Custard Filling – Smooth, Creamy, and Delicious
Now let’s make the heart of the pastry: the custard.
Ingredients You’ll Need (Recap)
- 2 cups whole milk
- 4 large egg yolks
- 1/2 cup granulated sugar
- 3 tbsp cornstarch
- 2 tsp pure vanilla extract
- A pinch of salt
Step-by-Step Instructions
- Heat the Milk:
- In a medium saucepan, heat the milk over medium heat until it just begins to simmer. Do not boil.
- Mix the Eggs and Sugar:
- In a separate bowl, whisk the egg yolks, sugar, cornstarch, and salt until smooth.
- Temper the Eggs:
- Slowly pour about half of the hot milk into the egg mixture while whisking constantly. This prevents the eggs from scrambling.
- Cook the Custard:
- Pour the mixture back into the saucepan and cook over medium-low heat, whisking continuously until it thickens to a pudding-like consistency.
- Add Vanilla:
- Remove from heat, stir in the vanilla extract, and let it cool to room temperature.
Assembling the Danish Pastries
Now comes the fun part: assembling these delicious pastries!
- Roll Out the Dough:
- Roll the chilled dough to about 1/4-inch thickness. Cut into squares (about 4×4 inches).
- Shape the Pastries:
- For classic shapes, fold the corners of each square toward the center to create a pinwheel. You can also twist the dough into braids or make circles with an indent in the middle for custard.
- Add the Custard:
- Spoon a generous dollop of custard into the center of each pastry.
- Proof the Pastries:
- Let the assembled pastries sit at room temperature for 30–45 minutes until slightly puffed.
- Bake to Perfection:
- Preheat your oven to 375°F (190°C). Bake the pastries for 15–20 minutes or until golden brown.
- Cool and Glaze:
- Let the pastries cool on a wire rack. Drizzle with a simple glaze made from powdered sugar, milk, and vanilla if desired.
Troubleshooting Common Dough & Custard Issues
Even seasoned bakers run into problems. Here’s a quick guide to some common issues:
- Dough won’t rise: Check your yeast’s expiration date and ensure the milk wasn’t too hot.
- Custard too runny: Cook it a bit longer and add an extra tablespoon of cornstarch if necessary.
- Pastries spread too much: The dough might have been too warm when baked—chill before baking.
Creative Variations of Custard Danish Pastries to Try
Want to get creative? Here are some delicious twists on the classic custard Danish pastry:
Fruit-Topped Custard Danishes 🍓🍑
Adding fresh or preserved fruit to your custard Danish gives it a vibrant, juicy burst of flavor. Try these combinations:
- Strawberry & Custard: Top your pastries with fresh strawberry slices before baking for a slightly caramelized, jammy flavor.
- Peach & Honey Custard: Add thin peach slices and drizzle with honey before serving.
- Blueberry Danish: Mix fresh or frozen blueberries into the custard for a tart-sweet contrast.
Chocolate-Filled Custard Pastries
Because who doesn’t love chocolate and custard together? A few easy ways to add chocolate:
- Chocolate Custard Danish: Add a tablespoon of cocoa powder to the custard for a rich chocolatey twist.
- Chocolate Drizzle: Melt dark chocolate and drizzle it over the pastries after baking.
- Nutella Custard Danish: Swirl Nutella into the custard before spooning it onto the pastries.
- If you love chocolatey pastries, you’ll definitely enjoy making Nutella Croissants—a delicious and easy-to-make treat with a rich,
Savory Danish Pastries with a Twist
Who says custard Danish pastries have to be sweet? Try these savory variations:
- Cheese & Herb Danish: Swap out the sweet custard for a creamy cheese filling (ricotta, cream cheese, or goat cheese), then sprinkle with herbs.
- Spinach & Feta Danish: A Mediterranean-inspired savory treat.
- Bacon & Egg Danish: Place a small cooked egg and crispy bacon on top of a cheesy custard filling for a breakfast-style Danish.
The Sweet Satisfaction of Homemade Custard Danish Pastries
Baking creamy custard Danish pastries from scratch may take some time and effort, but the rewards are absolutely worth it. From mastering the buttery, flaky pastry dough to crafting a smooth and luscious custard filling, you’ve now got all the tools to create bakery-quality pastries in your own kitchen.
Whether you stick with the classic version or get creative with fruit, chocolate, or savory variations, these pastries are sure to impress. Plus, with the right storage and reheating techniques, you can always have a delicious Danish pastry ready to enjoy—whether it’s for a quick breakfast, an afternoon treat, or a fancy dessert.